
If you’ve spent any time messing around with video generation models, you already know the frustrating truth: the model is only ever as good as the prompt you feed it. MiniMax H3 is no exception, but it does something a little different from most of the text-to-video tools you’ve probably tried before. It doesn’t just want a vibe or a mood board in words. It wants a script. A proper one, with shots, camera moves, dialogue, sound design, and music all laid out like you’re handing notes to a director.
That might sound like a lot, and to be fair, it kind of is. But once it clicks, you’ll find it gives you a level of control that’s hard to get anywhere else at the moment. This guide walks through everything: the different ways you can feed material into H3, how the prompt itself should be structured, and how the more advanced “full-reference” mode works when you’re mixing images, video clips, and audio together.
First things first: what is your starting reference?
MiniMax H3 supports a handful of different input modes, and which one you use depends entirely on what you’ve got to work with.
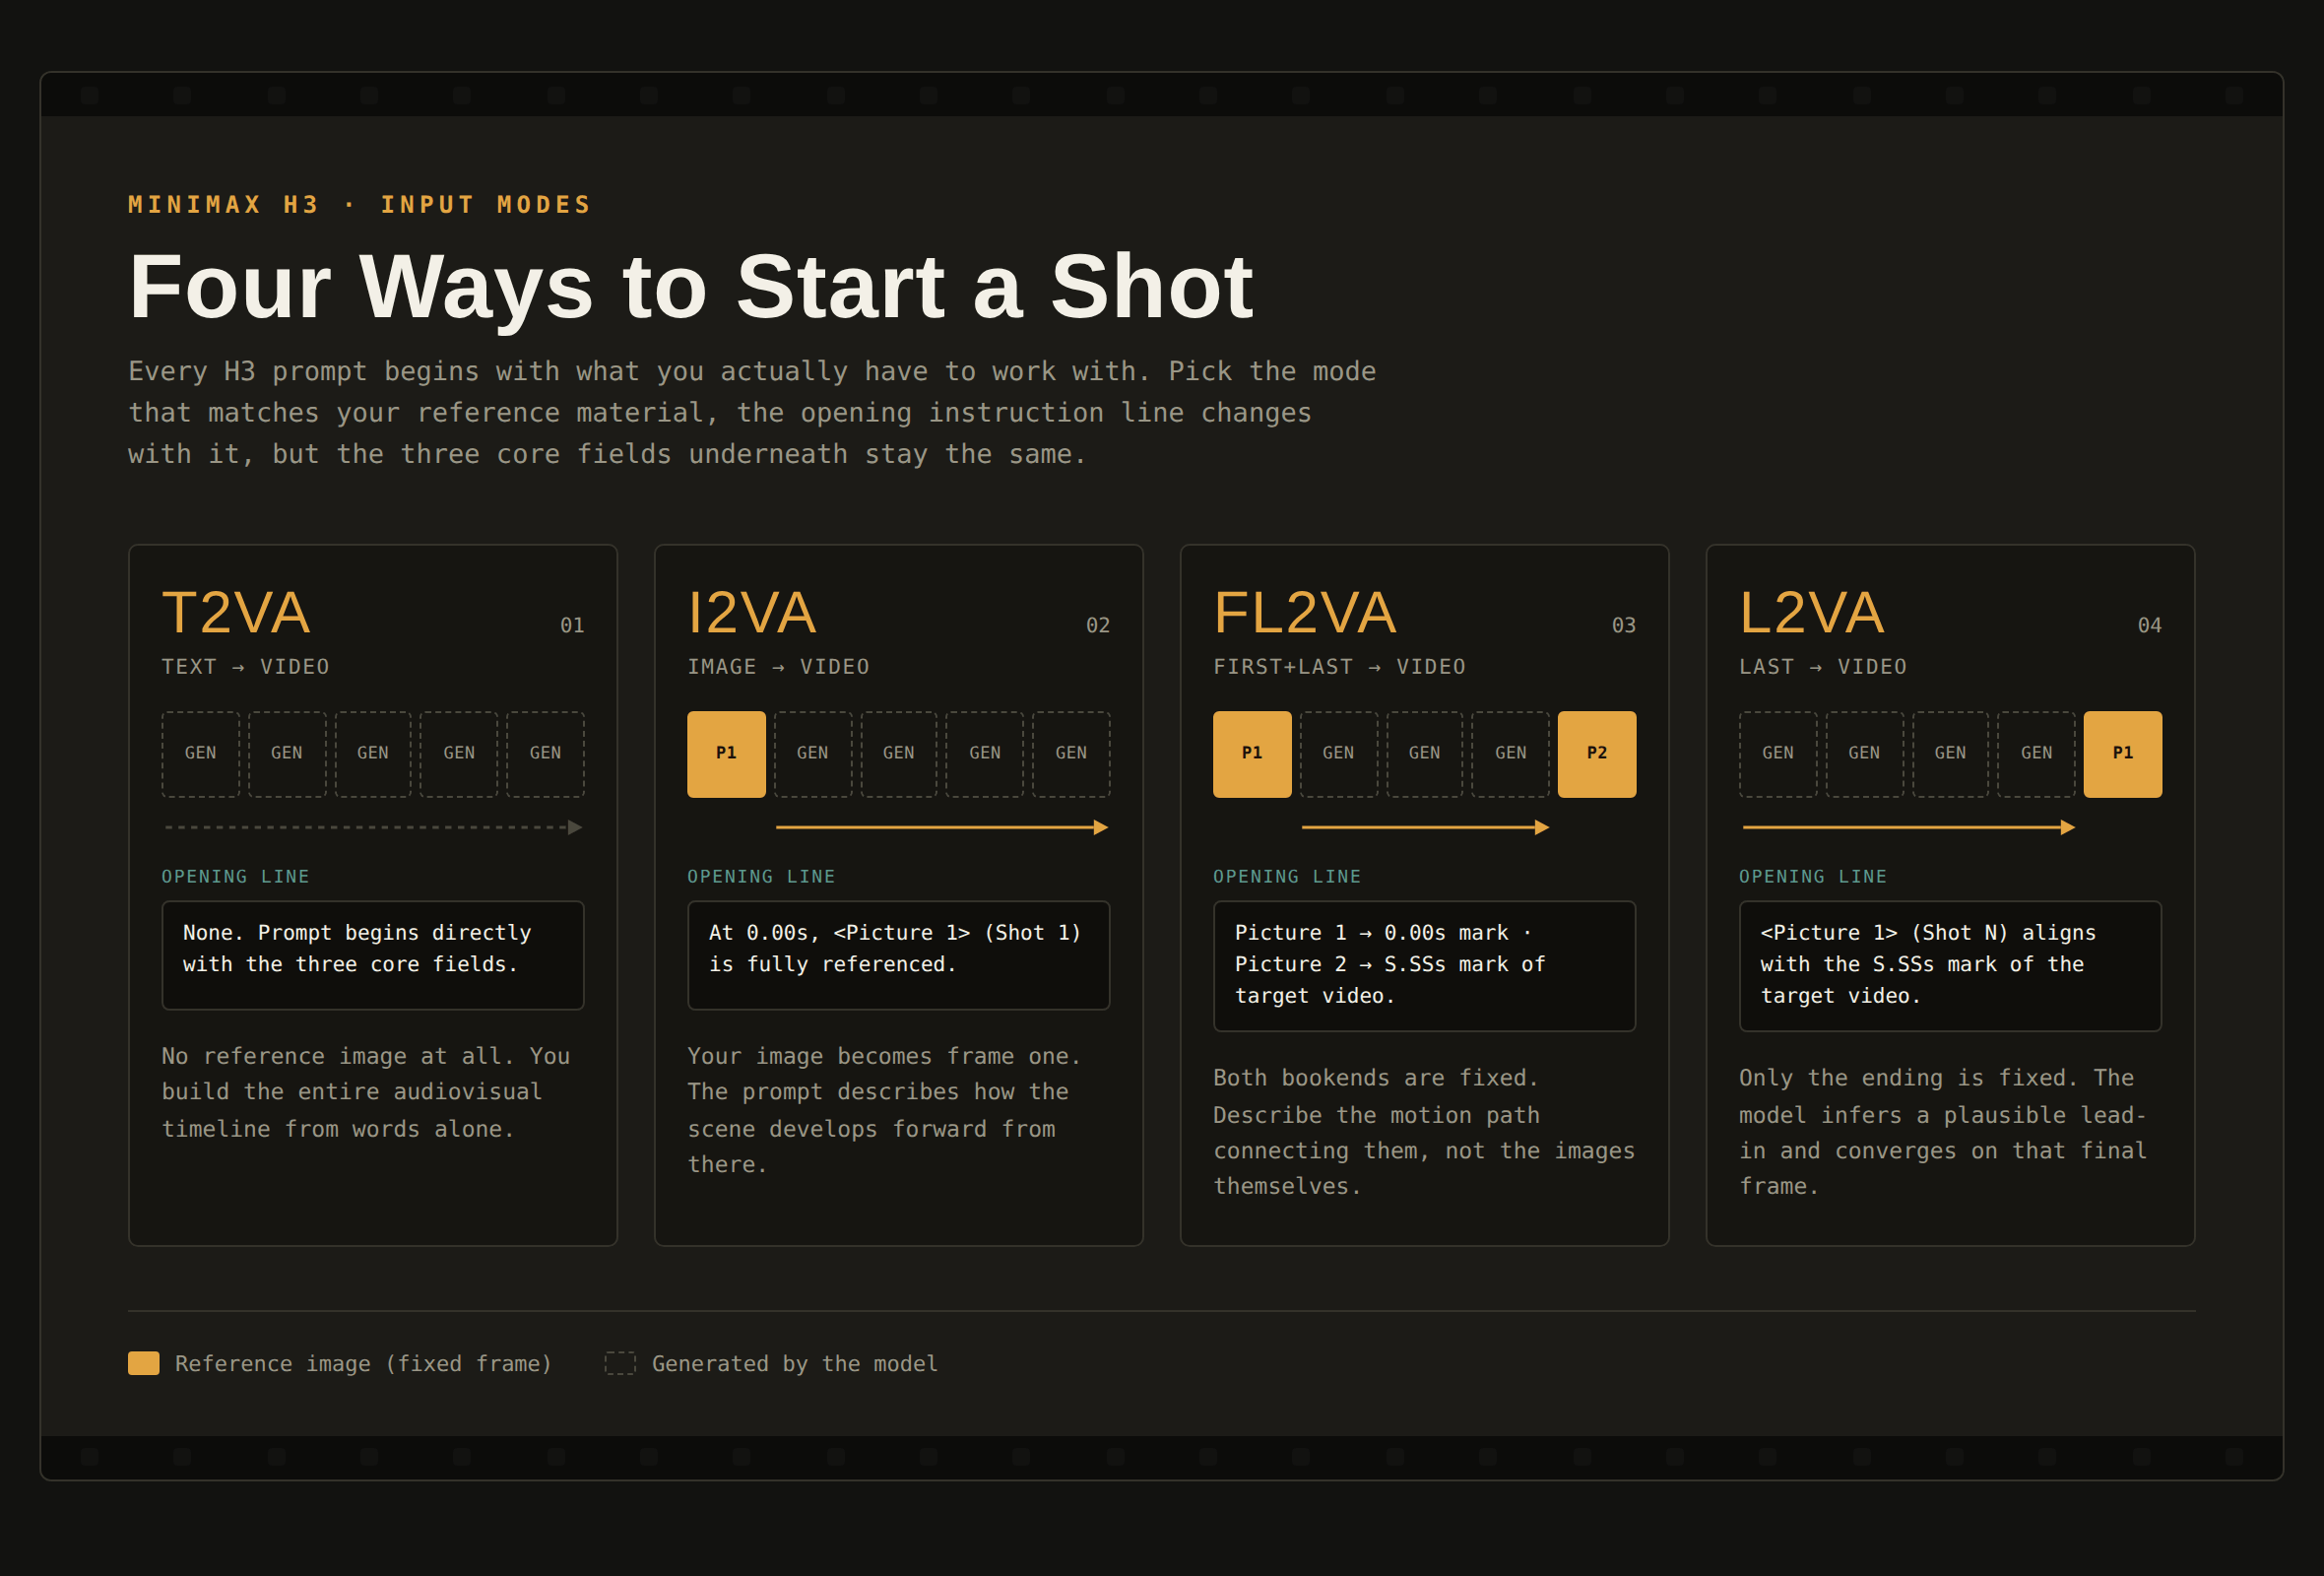
T2VA (text-to-video) is the classic approach. No reference image, no starting point, just words. You build the entire audiovisual timeline from scratch, describing the scene, the action, the sound, and the music yourself.
I2VA (image-to-video) starts from a picture. That image becomes the literal first frame of your video at 0.00 seconds, and your prompt describes how things develop and move forward from there.
FL2VA (first-and-last-frame-to-video) is for when you know exactly where a shot starts and exactly where it needs to end. You give the model both bookend images, and your job is to describe the path connecting them, not to redescribe the images themselves.
L2VA (last-frame-to-video) flips that around. You only supply the ending image, and the model has to infer a plausible beginning and then gradually work its way toward that final frame.
Each of these has its own opening instruction line that tells the model how your reference images map onto the timeline, and that line always comes first in your prompt, followed by a blank line before anything else.
The three fields that make up every prompt
No matter which input mode you’re using, the body of your prompt is built from three core sections. Get comfortable with these because they’re the backbone of everything when it comes to H3 prompting.
integrated_multimodal_description
This is where the real work happens. It’s the main narrative of your video: visuals, actions, camera movement, shot changes, who’s speaking and what they’re saying, plus any sound that’s actually happening within the scene (footsteps, a door creaking, a car passing by).
Start Shot 1 by establishing your overall visual style right at the top. Think in terms like cinematic, live-action, 2D-animated, 3D CG, claymation, watercolor, or vintage film. If you’re working from a reference image, pull the style from what’s actually in that image rather than making something up. If you’re doing pure text-to-video, this is your call to make based on what sort of video you need.
A good opening line looks something like this:
[Shot 1] Live-action, cinematic, a medium-wide shot frames a baker opening the shutters of a small street bakery before sunrise.
While it may seem simple, the important thing is that it immediately tells the model the genre, the framing, and the scene.
overall_soundscape
This is one to four sentences summarizing the ambient world of the video: think wind, rain, traffic, fabric moving, footsteps, breathing, that kind of thing. Don’t repeat dialogue or music here, since those live elsewhere. And unless you genuinely want total silence for the entire video, don’t just write “N/A” out of laziness – give it something to work with!
non_diegetic_music
This is the score, the stuff only the audience hears and the characters never do. Describe the actual instrumentation, tempo, and how the dynamics shift over time. Resist the urge to write things like “emotional and uplifting” because that tells the model nothing useful. Instead, say something like “sparse piano at a slow tempo, joined by sustained low strings that build gradually before fading out.” That’s something H3 can actually translate into sound.
Shots, cuts, and how to move the camera properly
Your first shot never gets a timestamp, it just begins. Every shot after that needs a strictly increasing cut time within the video’s total duration, written like this:
[Shot 2] At 00:03.500, the camera cuts to…
For a standard cut, stick with phrases like “the camera cuts to,” “the shot transitions to,” or “the shot switches to.” Cross-dissolves, fades, and wipes are available too, but only pull those out when they’re specifically requested. A cut should always be earning its place by introducing something genuinely new: a new subject, a new space, a new angle. If all you need is a slight change in distance or angle, don’t cut, just move the camera instead.
And camera movement in H3 breaks down into three layers that stack together: motion type, amplitude, and speed.
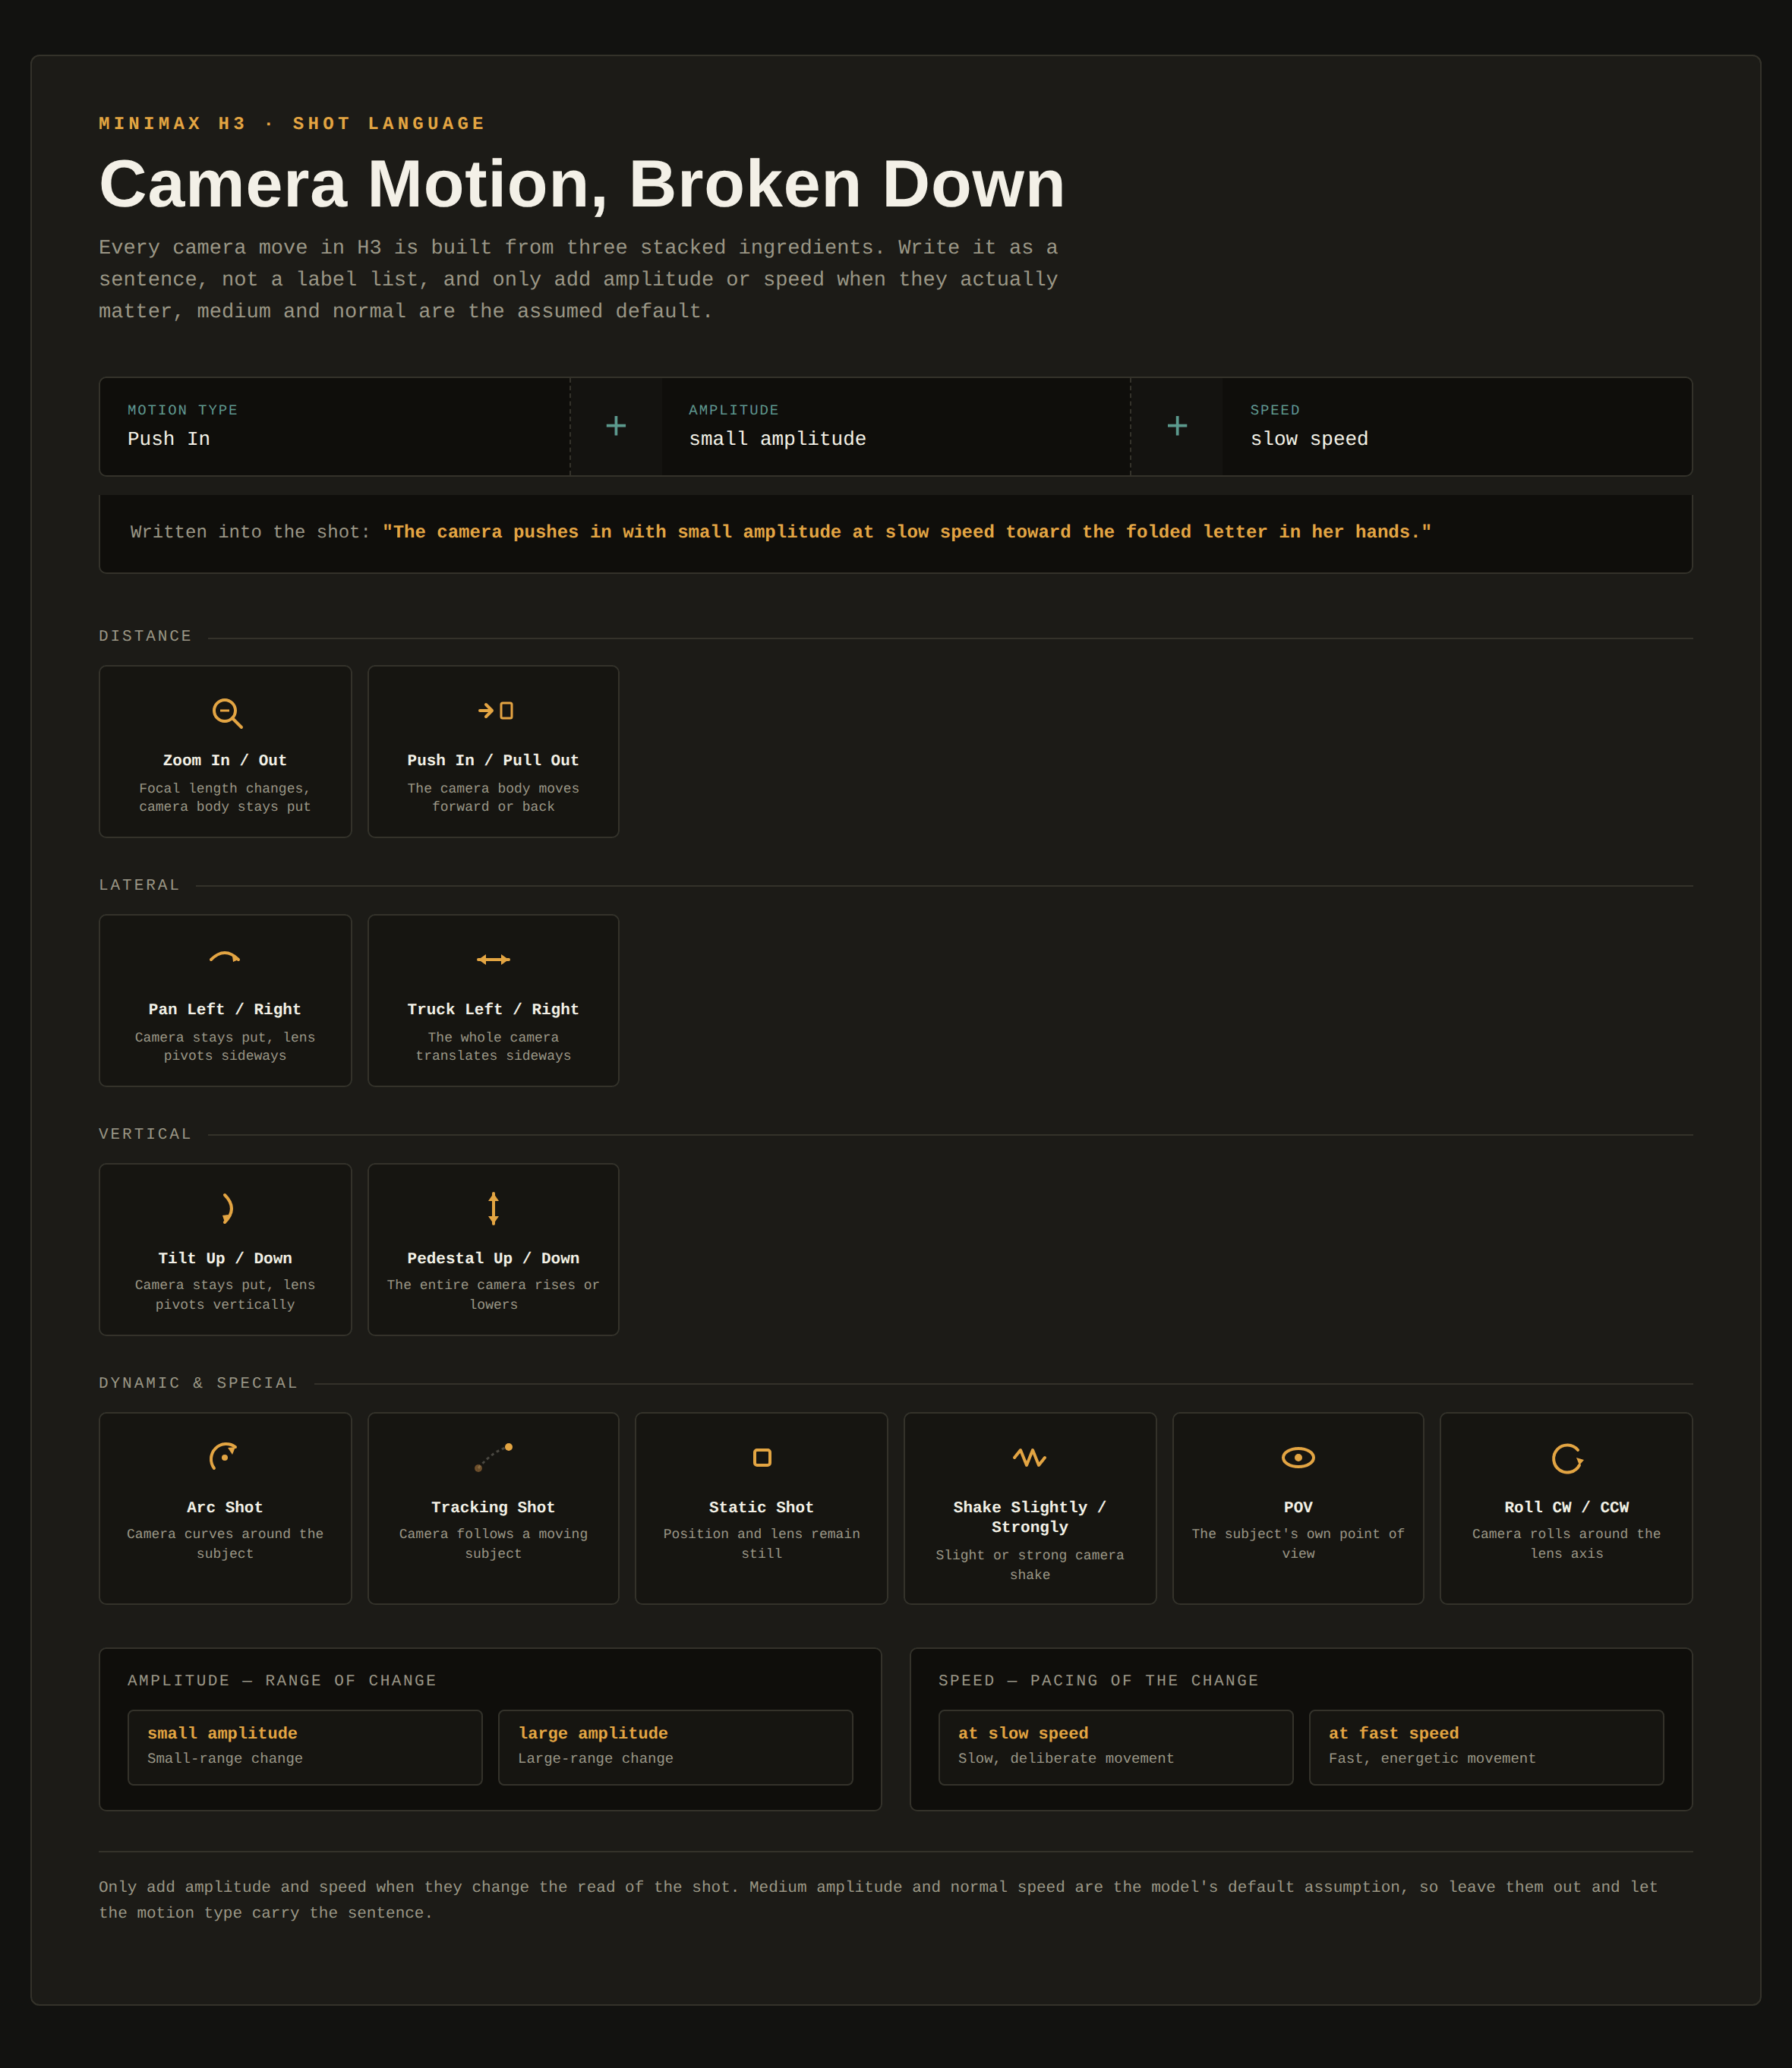
Motion type covers things like Zoom In/Out, Push In/Pull Out, Pan Left/Right, Truck Left/Right, Tilt Up/Down, Pedestal Up/Down, Arc Shot, Tracking Shot, Static Shot, Shake Slightly/Strongly, POV, and Roll Clockwise/Counterclockwise. Amplitude is either small or large, and speed is either slow or fast. You don’t always need to specify amplitude and speed, medium and normal are usually the default assumption, so only add them when they actually matter to the shot.
The trick here is writing camera direction as natural action within the sentence rather than bolting labels onto the end like a spec sheet. Compare these two:
Bad: “Camera pushes in, small amplitude, slow speed, folded letter.”
Good: “The camera pushes in with small amplitude at slow speed toward the folded letter in her hands.”
The second one actually reads like a shot description a human would write, and it gives the model something more coherent to visualize!
Getting dialogue and voices right
If a character speaks, sings, or you want an off-screen voice, give them a stable ID like (S1) or (S2). If two people speak at once, combine them as (S1,S2). Once someone has an ID, it stays with them across every shot they appear in. Characters who never make a sound don’t need one at all.
The first time a speaker shows up, give the model enough to lock in a consistent voice: their age, gender, pitch, pace, accent, whatever helps establish who they are sonically. Keep all of that description outside the actual dialogue tag. Inside the <d> tag, only the language marker and the exact words spoken belong, nothing else, and you should never translate or rewrite what’s inside it.
The young woman with a quiet, breathy voice (S1) says: <d>[English] I get off at the next station.</d>
For voiceover, use the exact phrase “says in an off-screen voiceover,” and immediately follow it by noting that the on-screen character’s lips stay closed, since otherwise the model might try to sync their mouth to words they’re not physically saying.
If a line of dialogue or a lyric needs to carry across a cut, use <scenetrans> at the connection points and state explicitly that the audio continues uninterrupted. If speech gets cut off by the video simply ending, mark it with <cutoff> instead.
On-screen text
Anything visibly written in the scene, a sign, a banner, a subtitle, a neon light, goes inside English double quotation marks exactly as it should appear, with no translation:
A red neon sign reading “营业中” glows above the doorway.
Full-reference mode
Once you start mixing multiple images, video clips, and audio tracks into a single generation, you move into what MiniMax calls full-reference mode. It’s more involved, but it’s also where H3 really shows off, because it lets you pull a face from one photo, a walking motion from a video clip, and a voice timbre from an audio file, and blend them into one coherent shot.
Full-reference prompts are built from six sections instead of three, always in this order: subject_definitions, summary, retention_analysis, detailed_description, overall_soundscape, and non_diegetic_music.
The four reference labels
This is really the heart of full-reference mode, and it’s worth learning if you’re serious about producing high-quality clips with H3.
<Subject N> covers anything reusable and visible: a person, an animal, an object, a setting, an outfit, a style, even a pose or expression. It represents the thing itself, not the file it came from. One subject can be pieced together from multiple sources too, for instance a person’s face from one photo and their walk from a video clip.
<Picture N> is for a reference image acting as a literal frame, whether that’s a first frame, a last frame, or a storyboard anchor for planning out a shot.
<Video N> is reserved for whole-video relationships: editing an existing clip, continuing on from where it ends, or borrowing its cutting rhythm and camera structure.
<Audio N> covers any audio being copied or referenced, whether that’s a full track, a voice’s timbre, or just a beat you want the video to match.
Once you assign a label, it keeps its meaning through the entire prompt, across every section. You define it once in subject_definitions, then just refer back to it.
<Subject 1> is the young woman in <Picture 1>, with long dark hair, a blue cardigan, and a thin silver necklace.
Telling H3 what kind of task this is
In the summary section, you open with a bracketed tag describing the task type, and you can combine multiple types with a plus sign when needed. The options are keyframe completion, reference generation, video editing, video continuation, audio reuse, and audio reference. So editing a source clip while keeping its original audio would read as [video editing + audio reuse]. This little tag does a lot of heavy lifting, it tells the model exactly what kind of relationship it should have with each reference asset.
Explaining how much of the reference actually carries over
retention_analysis is where you clarify, for every single label, how faithfully it should be preserved. For visible content, you’ll use one of four markers: fully_preserved, partially_preserved, attribute_transfer, or weak_reference. For audio, the equivalents are fully_copy, partially_copy, reference, and weak_reference. This step matters more than it might seem, because it’s the difference between “make the video look exactly like this photo” and “just take general inspiration from this photo’s mood.”
Writing the actual scene
detailed_description replaces integrated_multimodal_description in full-reference mode, but it works the same way underneath, shots, cuts, camera moves, dialogue, all of it. The one real difference is that you open with a sentence or two setting the overall style before diving into Shot 1, and you weave your reference labels naturally into the description as they become relevant.
The target video is in a cinematic, literary music-video style with soft lighting and a slightly desaturated color palette. [Shot 1] The scene opens in a crowded urban street…
For generation tasks, aim for somewhere around 350 to 500 words in this section. If your source video is genuinely complex and you’re editing it, that range can flex, don’t force padding just to hit a number if a single shot doesn’t need it, and don’t rush a dense, dialogue-heavy scene just to stay short either.
If this all sounds like too much: let AI write the prompt for you!
Here’s something worth knowing before you spend an hour hand-writing shot lists: you don’t actually have to memorize any of this. One of the simplest ways to get a great H3 prompt is to just hand the official documentation straight to Claude (or whichever chatbot you use) and ask it to write the prompt for you. Some may consider this the lazy method, but honestly, with the more complex models such as H3, it can be a real time-saver and can output some genuinely impressive prompts.
MiniMax publishes both guides directly on Hugging Face, the base prompting guide for T2VA/I2VA/FL2VA/L2VA, and the full-reference guide for anyone mixing images, video, and audio together. Drop the link (or paste the raw text) into your chat, describe the scene you want in plain English, and ask the model to format it properly using H3’s structure. Here’s a simple starter prompt you can use if needed:
“Here’s MiniMax H3’s official prompt writing guide: [link]. I want a video of a woman walking through a rainy city at night, umbrella up, neon signs reflecting in puddles. Write me a full T2VA prompt following this format exactly, including the three core fields and the camera direction.”
Because the guide spells out the exact structure H3 expects, brackets, field names, dialogue tags, camera phrasing and all, a capable chatbot can follow it almost to the letter. It’s especially handy for the fiddlier bits, like getting the <d> dialogue tags right, keeping speaker IDs consistent across shots, or writing out the full six-section format for full-reference mode without missing a section.
It’s not going to replace understanding what you actually want the video to look like, that part’s still on you, but it takes care of the formatting overhead almost entirely. Worth trying before you write your next prompt from scratch!
A few things worth remembering
Be specific about sound, always. Vague mood words like “epic” or “emotional” don’t give the model anything concrete to render. Tell it the instrument, the tempo, and how the dynamics change instead.
Treat camera movement as a sentence, not a checklist. It should read like part of the action, not a technical annotation stapled onto the end.
When you’re in full-reference mode, take the extra minute to actually think through your retention markers. Fully preserved versus weak reference is a genuinely big difference in output, and it’s an easy thing to gloss over if you’re moving fast.
And don’t be afraid of the length! H3’s prompting format looks intimidating at first glance, all those brackets and labels and tags, but it exists because it gives you a real say over the finished video. A vague one-line prompt gets you a vague, generic video. A properly scripted one gets you something closer to what you actually pictured in your head.
Once you’ve written a couple of these, the structure stops feeling like work and starts feeling more like second nature, the same way storyboarding does for anyone who’s spent time around film production. Give it a real shot on your next generation and you’ll probably notice the difference immediately!

