Here’s a super useful method to get high quality upscales for free using Stable Diffusion. The upscalers which come packaged within the AUTOMATIC1111 Stable Diffusion web UI are extremely powerful free upscaling options for your images. Sadly, a lot of people are put off from using them as it requires a bit of setup (same with Stable Diffusion in general). I decided to write this guide to help those of you who haven’t used SD for upscaling yet, it’s surprisingly powerful! I personally use the ESRGAN_4x model when I upscale this way, but there are quite a lot of other options, I’d definitely recommend trying a few out and seeing which works best with your style of images. It’s also true that some upscaling models work better with certain image styles, so some experimenting is required. You’re probably eager to get into the how to, so let’s get started with the guide on how to upscale images with Stable Diffusion!
Note: This guide assumes that you are using AUTOMATIC1111 as a web interface. If you haven’t already installed it, you can check out an easy installation guide here!
- First, open the AUTOMATIC1111 Stable Diffusion web UI.
- Click on the “img2img” tab at the top of the screen.
- In the prompt box, type in a description of the image you want to upscale.
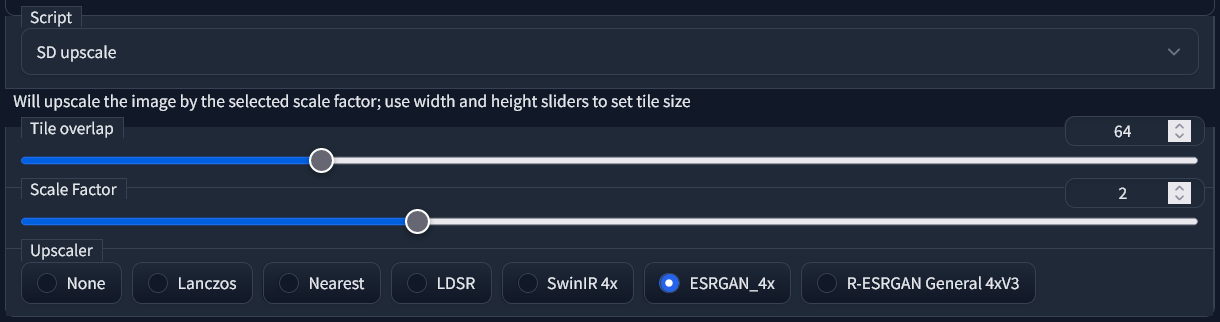
- Go down to the “Scripts” section at the bottom and select the “SD Upscale” script.
- Next, load an initial image into the box by clicking on the “Choose File” button or dragging and dropping.
- You’ll need to choose an upscaler to use. There are several options available by default, but you can also download additional models from here. ESRGAN_4x is a popular choice.
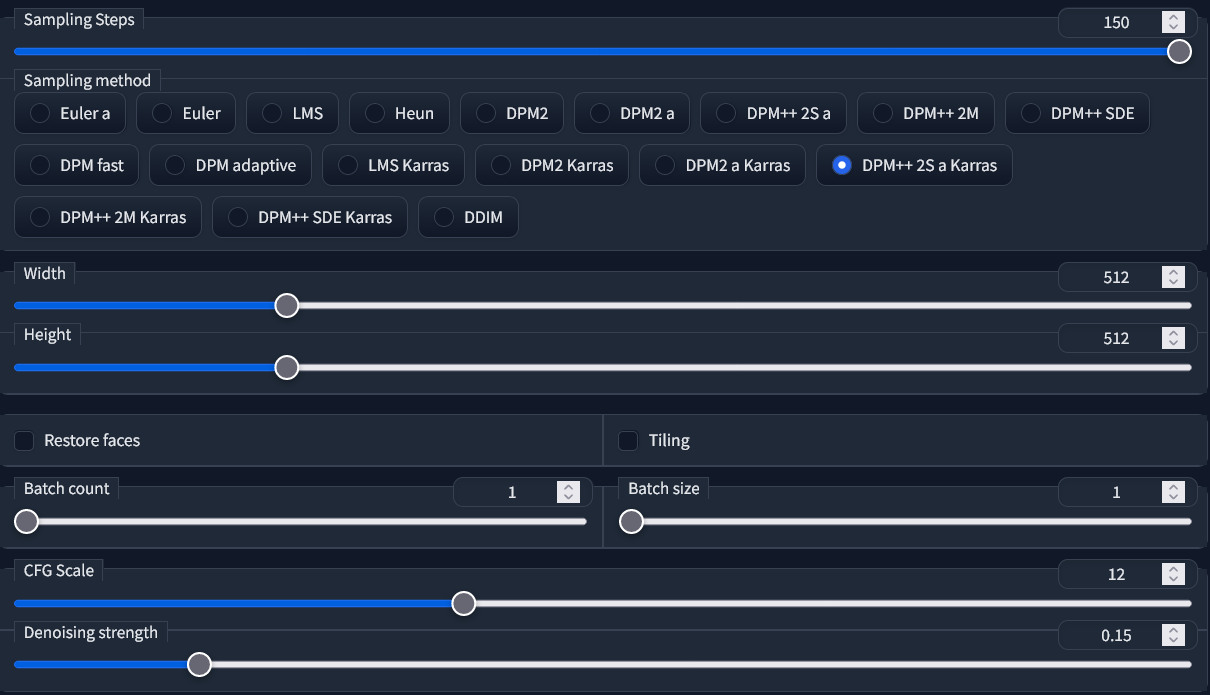
- Now it’s time to set the parameters for your upscaling process. For the best results with SD upscaling, I’d recommend using a high number of steps (100-150), a high CFG scale (between 8 and 15), and a low denoising strength (around 0.1 to 0.2). You can also use the width and height settings to specify the tile size – a common choice is 512×512.
- When you’re ready, click on the “Generate” button to begin the upscaling process. This will double the size of your image (for example, a 512×512 image will become 1024×1024).
- To further upscale your image, click on the “Send to img2img” button and then click “Generate” again once the image loads in the box on the left. This will double the size of the image again (for example, to 2048×2048).
- Repeat this process as many times as you like to achieve the desired image size. Remember to save your upscaled image once you’re finished by clicking on the “Save” button.

Aside from using Stable Diffusion’s upscaling methods, there is another way to upscale your images easily – by using a separate AI image upscaler. Gigapixel AI by Topaz Labs is my personal favorite due to how high it can upscale, though you can check out many alternatives (some free!) on the AI image upscalers category page.

