Stable Diffusion XL (SDXL) is one of the most powerful AI image generation models available today. Developed by Stability AI, SDXL builds on the original Stable Diffusion model with over 1.5 billion parameters, allowing it to generate incredibly realistic and detailed images from text prompts.
However, the huge size of SDXL also makes it very demanding on GPU memory (VRAM). Therefore, it requires graphics cards with at least 24GB of VRAM to run properly. This restricts usage of SDXL to high-end GPUs that are expensive and not widely accessible to many people.
There is, however, a new solution for users with lower-end graphics cards and less VRAM! The new “Segmind SSD-1B” model provides a way to run SDXL-quality image generation with lower VRAM requirements (up to 40% more memory efficient). SSD-1B is basically a distilled and optimized version of SDXL with 1.3 billion parameters. At 50% smaller than the original, it can run well on GPUs with just 8GB VRAM. While it’s possible to get it working on 4-6GB VRAM cards, the generation speed will unfortunately be extremely long.

In this guide, we’ll cover a few of the benefits and differences of using SSD-1B over SDXL, and explain how to get started with this optimized SDXL model even with moderate VRAM.
Benefits of Using SSD-1B
- Lower VRAM needs – With a smaller model size, SSD-1B needs much less VRAM to run than SDXL. This makes it feasible to run on GPUs with 10GB+ VRAM versus the 24GB+ needed for SDXL.
- Faster inference speed – The distilled model offers up to 60% faster image generation over SDXL, while maintaining quality. This improves real-time use.
- Easier to deploy – The smaller model size also makes SSD-1B easier to deploy on platforms like Hugging Face Spaces.
- Maintains SDXL capabilities – Despite being smaller, SSD-1B retains the high-quality text-to-image generation capabilities of SDXL through distillation.
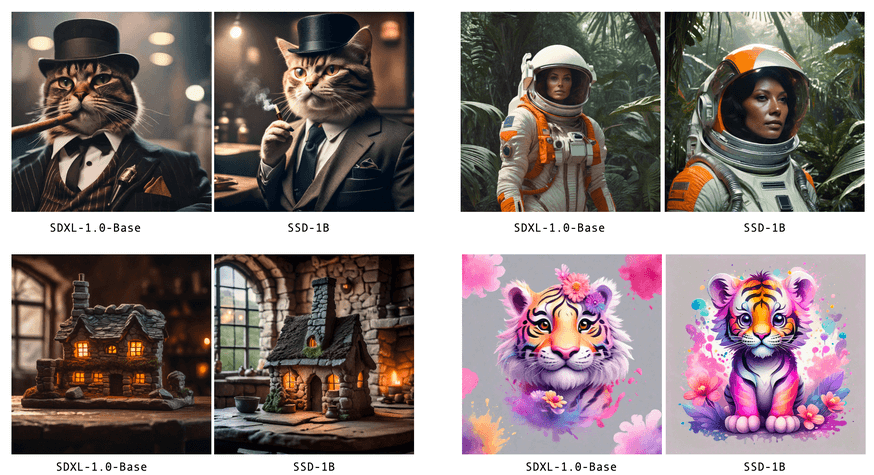
SDXL vs SSD-1B Comparison Images
In the images below, you can see the comparison between the base SDXL model and the newly optimized SSD-1B model. All images were using the same prompts.
Getting Started With SSD-1B
To get started using the SSD-1B model for image generation with HuggingFace Diffusers:
- Install Diffusers:
pip install git+https://github.com/huggingface/diffusers
- Install dependencies Safetensors, Transformers, and Accelerate:
pip install transformers accelerate safetensors
- With the prerequisites installed, you can run the model with the following code:
from diffusers import StableDiffusionXLPipeline
import torch
pipe = StableDiffusionXLPipeline.from_pretrained("segmind/SSD-1B", torch_dtype=torch.float16, use_safetensors=True, variant="fp16")
pipe.to("cuda")
# if using torch < 2.0
# pipe.enable_xformers_memory_efficient_attention()
prompt = "An astronaut riding a green horse" # Your prompt here
neg_prompt = "ugly, blurry, poor quality" # Negative prompt here
image = pipe(prompt=prompt, negative_prompt=neg_prompt).images[0]
SSD-1B can also be used in ComfyUI and AUTOMATIC1111. Please see the instructions below for how to use the model with these interfaces.
SSD-1B With ComfyUI
The developers of the model have now further optimized it to be compatible with ComfyUI. To get SSD-1B working in ComfyUI:
- Download the safetensors/checkpoint file from: https://huggingface.co/segmind/SSD-1B/tree/main
- Move the checkpoint file into your ComfyUI model checkpoints folder (ComfyUI/Models/Checkpoints).
- In the ComfyUI interface, make sure that SSD-1B safetensors file is selected as the “ckpt_name”.
- Configure your usual SDXL workflow, or use a pre-made template. We recommend checking out Nerdy Rodent’s great showcase video on SSD-1B in ComfyUI: https://www.youtube.com/watch?v=F-bKndyQ7L8 – he even shares the workflow so you can use his template if needed! You can find a link to download the template in the video description.
SSD-1B With AUTOMATIC1111
To use SSD-1B with AUTOMATIC1111, you’ll need to download the “SSD-1B-A1111.safetensors” checkpoint file. Simply drag the checkpoint file into your A1111 checkpoints folder (stable-diffusion-webui/models/stable-diffusion). Make sure you have the safetensors file selected as your Stable Diffusion checkpoint in the top left of your interface.
Hopefully this guide has helped offer you some insight and useful tips for getting SDXL running on lower end graphics cards with less VRAM. In our testing with a standard RTX 3070, we found that the base SDXL model, while usable, did take around 1 minute for each image generation. With the SSD-1B model, this was reduced to around 20-30 seconds. In our experience, if you have a card with 8GB VRAM, then we highly recommend using the SSD-1B model as an alternative to SDXL!

