Silly Tavern AI is an exciting new chatbot application that allows you to interact with various characters in engaging conversations. Since the app needs to be installed locally on your PC, some people might be wondering how exactly this is done. In this guide, we’ll walk you through the installation process step-by-step to get you up and running with Silly Tavern AI on your Windows or Linux computer. While Silly Tavern is also available on Android, these installation steps will only apply to Windows and MacOS/Linux.
For installing Silly Tavern on Android, please refer to this guide by user ArroganceComplex#2659.
Before we begin, please note the following warnings from the creators of SillyTavern:
- Do not install into any Windows controlled folder (Program Files, System32, etc).
- Do not run “Start.bat” with administrator privileges.
- Installation on Windows 7 is not possible as it cannot run NodeJS 18.16.
Installing on Windows
Step 1: Install NodeJS
NodeJS is a runtime environment required to run Silly Tavern AI, it’s recommended to install the latest version. Follow these steps to install NodeJS:
- Visit the NodeJS website: https://nodejs.org/en/download/
- Download the latest LTS (Long Term Support) version for Windows.
- Double-click the downloaded installer and follow the installation instructions.
Step 2: Clone the SillyTavern Repository using GitHub Desktop
GitHub Desktop is an easy way to clone the SillyTavern repository. Follow these steps to get the code on your computer:
- Install GitHub Desktop: Visit https://desktop.github.com/
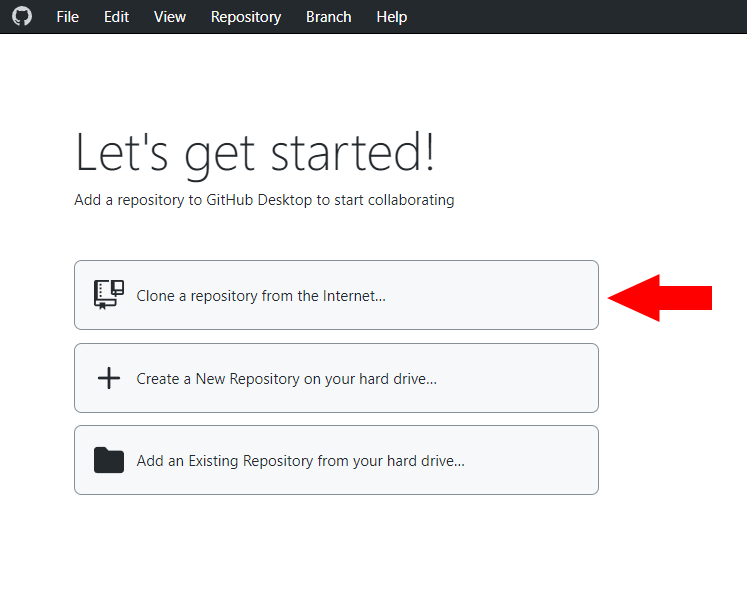
- Open GitHub Desktop and click “Clone a repository from the internet…”
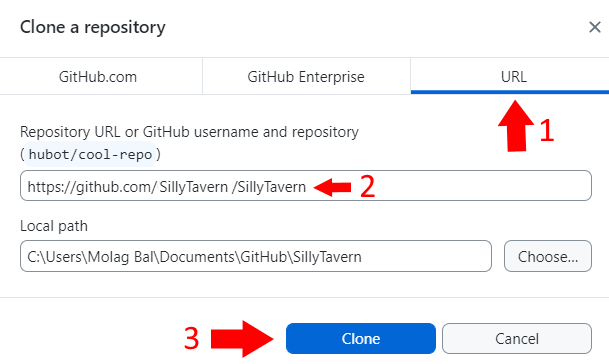
- In the URL tab, enter: https://github.com/SillyTavern/SillyTavern
- Click “Clone” and choose a local path for the repository.
Step 3: Opening SillyTavern AI
Now that you have cloned the repository, let’s start SillyTavern AI:
- Open Windows Explorer (Win+E).
- Browse to the folder where you cloned the repository (e.g., C:\Users[Your Windows Username]\Desktop\GitHub\SillyTavern).
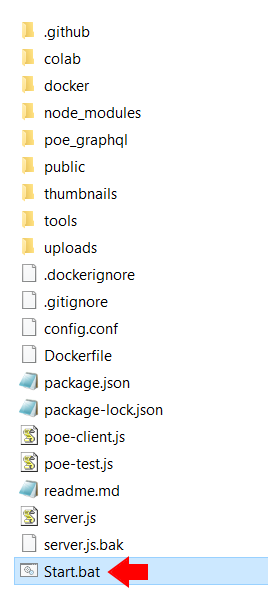
- Look for the “start.bat” file (Note: “.bat” may be hidden, appearing as “Start “).
- Double-click the “start.bat” file to initiate the installation process.
Step 4: Complete the Installation
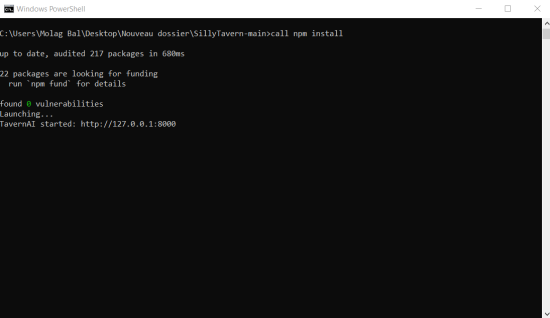
Once you’ve opened the bat file, a command console window will open and SillyTavern AI will begin installing its requirements:
- Allow the installation process to complete; it may take a few minutes!
- After successful installation, the command console window should display a message indicating readiness.
- SillyTavern AI will open in your browser, ready for you to start chatting!
Step 5: Start Chatting!
Congratulations! Silly Tavern AI is now installed and running on your system. It’s important to note that in order to start chatting with characters, you’ll need to connect to any of the supported APIs. This can be done by clicking on the plug icon in the upper left within the Silly Tavern interface. You can view a full list of supported APIs on this page.
Installing on MacOS/Linux
Step 1: Install Git and NodeJS
Before proceeding with the installation, make sure you have Git and NodeJS installed on your system. If you already have them installed, you can skip this step.
For MacOS: You can install Git and NodeJS through Homebrew, a package manager for MacOS. Open the Terminal and run the following commands:
brew install git
brew install node
For Linux: For Linux users, the method of installing Git and NodeJS may vary depending on your distribution. Here are the general commands for some popular package managers:
For Ubuntu/Debian:
sudo apt-get update
sudo apt-get install git
sudo apt-get install nodejs
For Fedora:
sudo dnf install git
sudo dnf install nodejs
For CentOS:
sudo yum install git
sudo yum install nodejs
Step 2: Clone the SillyTavern Repository
Once you have Git and NodeJS installed, open the Terminal and navigate to the directory where you want to install SillyTavern. Use the following commands to clone the repository:
For the Main Branch:
git clone https://github.com/SillyTavern/SillyTavern -b main
For the Dev Branch:
git clone https://github.com/SillyTavern/SillyTavern -b dev
Step 3: Navigate to the Install Folder
After cloning the repository, navigate into the SillyTavern installation folder using the cd command:
cd SillyTavern
Step 4: Run the Installation Script
Now, it’s time to run the installation script. SillyTavern provides two options for running the script. You can use either of the following commands:
./start.sh
or
bash start.sh
This script will take care of the installation process and set up SillyTavern on your system.
Step 5: Verify the Installation
Once the installation script has completed successfully, you can verify if SillyTavern is working correctly by launching it from the Terminal. Simply type SillyTavern and press Enter. If everything was installed correctly, SillyTavern should launch, and you’ll be ready to then connect your API key(s) and start interacting with the chatbot characters!
That’s it! You’ve successfully installed SillyTavern on your MacOS or Linux system.
We hope that this installation guide has been helpful in getting Silly Tavern AI set up on your system. It really is a fun tool to play around with! For those of you who might be familiar with Character.AI, another popular LLM chatbot with characters, there is actually a way to import your characters from there into Silly Tavern. If you’d like to learn how to do this, we recommend watching this tutorial video by MustacheAI.
While using the GPT-4 API does yield the best responses, we don’t really recommend using it as the API calls can really ramp up and end up costing you quite a bit of money! KoboldAI is a good choice as it’s free and can run locally on your machine or with Google Colab.

