GPT4All is basically like running ChatGPT on your own hardware, and it can give some pretty great answers (similar to GPT3 and GPT3.5). Setting it up, however, can be a bit of a challenge for some people, especially if you’ve never used GitHub or open-source tools before. In this short guide, we’ll break down each step and give you all you need to get GPT4All up and running on your own system.
Note: This guide will install GPT4All for your CPU, there is a method to utilize your GPU instead but currently it’s not worth it unless you have an extremely powerful GPU with over 24GB VRAM. If you still want to see the instructions for running GPT4All from your GPU instead, check out this snippet from the GitHub repository.
Update: There is now a much easier way to install GPT4All on Windows, Mac, and Linux! The GPT4All developers have created an official site and official downloadable installers for each OS. You can visit the official GPT4All website here: (https://gpt4all.io/index.html).
Step 1: Clone the Repository
Clone the GPT4All repository to your local machine using Git, we recommend cloning it to a new folder called “GPT4All”. Open your terminal or command prompt and run the following command:
git clone https://github.com/nomic-ai/gpt4all.git
This will create a local copy of the GPT4All repository on your machine.

Step 2: Download the Model Checkpoint
The next step is to download the GPT4All CPU quantized model checkpoint. Here is a direct link and a torrent magnet:
Direct download: https://the-eye.eu/public/AI/models/nomic-ai/gpt4all/gpt4all-lora-quantized.bin
Once the download is complete, move the gpt4all-lora-quantized.bin file to the “chat” folder in the cloned repository from earlier.
Step 3: Navigate to the Chat Folder
Navigate to the chat folder inside the cloned repository using the terminal or command prompt. You can do this by running the following command:
cd gpt4all/chat
This will take you to the chat folder. Alternatively, if you’re on Windows you can navigate directly to the folder by right-clicking with the Windows key held down and selecting “Open PowerShell window here”.
Step 4: Run the Model
Once you are in the chat folder, run the appropriate command for your operating system. Here are the commands for different operating systems:
- Windows (PowerShell):
./gpt4all-lora-quantized-win64.exe
- M1 Mac/OSX:
./gpt4all-lora-quantized-OSX-m1
- Linux:
./gpt4all-lora-quantized-linux-x86
- Intel Mac/OSX:
./gpt4all-lora-quantized-OSX-intel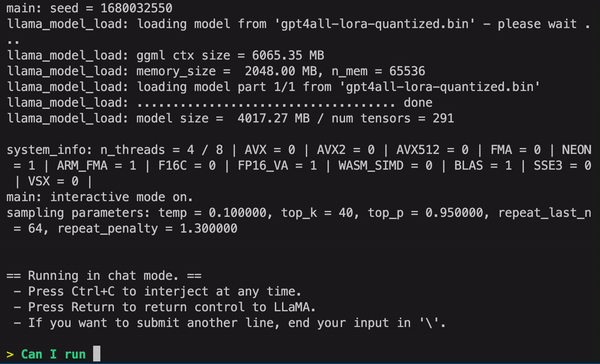
This will start the GPT4All model, and you can now use it to generate text by interacting with it through your terminal or command prompt. Similar to ChatGPT, you simply enter in text queries and wait for a response. It may be a bit slower than ChatGPT depending on your CPU, but the main difference is that there are no limits or network problems to worry about since it’s running on your own hardware.
Congratulations! You have successfully installed and run the CPU quantized version of the GPT4All model checkpoint on your local machine. GPT4All is still in early development and is constantly improving, so be sure to keep your install up to date. You can easily update the repository at any time by navigating to your main install folder and running "Git pull".

